I’ve been wanting to do this for some time, and I think I’m taking the plunge - you’ll start seeing restaurant reviews on here as well as code.
Four and Twenty, East Johnson, Madison
To start with, I can’t believe I’ve never been here. Well, actually, it stands to reason - Four and Twenty stands in a tiny commercial space amid tightly-knit ranch houses and sandwiched between the thoroughfares of East Wash and Packers Ave, so it’s easy to drive right on past and not give it a second thought.
To do so would be a mistake. Mel and I were on our way to an art fair in the neighborhood and she commented that her friend Phil sometimes works here. We were looking for something small and quick to eat, and Four and Twenty fit the bill.
The cafe is small with big windows out onto a soccer field and a concrete patio with planters - in summer it’s flooded with light, which illuminates all the imperfections (and the artwork) inside. The swinging doors to the kitchen don’t completely block its view, nor that of the supply room, giving it a just-moved in feel.
Mel and I ordered breakfast sandwiches, and they were probably my ideal quick brunch if I could ever describe it. I had an egg and cheddar with spinach and sauteed mushrooms, on the second-best biscuit I’ve ever had (that honor goes to Third & Hollywood in Columbus). The biscuit was big and firm. It didn’t flake off in layers or crumble in little ball-bearings of dough - it held together and didn’t stick my tongue to the roof of my mouth. This biscuit is definitely something to write home about. A small cup of fruit accompanied the sandwich and made for a well-priced, well-portioned breakfast that didn’t make me want to nap afterward.
I should also mention my drink, since it was even better than my sandwich - props to Phil. An iced chai latte with a rich milkiness that I’m often lacking. It was understated and sweet and I’d like to have another soon.
I do love to cook. All of my favorite recipes are stored in my head, are improvised off the cuff, or found in a gross stack of crinkled papers held together with a binder clip in my cabinet.
I do a lot of looking up recipes online, but every recipe website I’ve seen has a big flaw. These sites are not designed to help you actually read the recipe. They are designed to keep you clicking around, keep you sharing recipes on social media, keep you seeing ads.
I wanted a recipe app that would just show me what I needed to gather and how to put it together to cook it all. In the meantime, I decided it wouldn’t hurt it if were also pretty to look at. Lastly, I wanted it optimized for use on an iPad so that I could keep it close at hand while actually cooking.
Technical Design
Python is my pet language, and I wanted a database that would be easy to use with native Python types. Recipes are well-suited to a document-oriented store - each recipe has highly-variable ingredients. The only potential advantage I could see for a relational db would be to answer queries like “show me all the recipes with onion as an ingredient”.
RethinkDB is great because it has a native web interface and a cool query language called ReQL.
I used Python and Flask to write the app, and Tornado to make it easy to deploy - I can never seem to get uWSGI or Gunicorn working correctly.
Frontend Design
Two design elements set Rethink Recipes apart:
When a recipe is entered, the app finds the top 8 Google Images hits for the title of the recipe. It uses the colors found in these images to calculate a unique, indivualized color palette for each recipe.
Whenever an ingredient appears verbatim in the directions, it is highlighted in the directions. This makes it easy to scan the directions for the step you should be on next.
App Routes
Here are the nuts and bolts of how Rethink Recipes works:
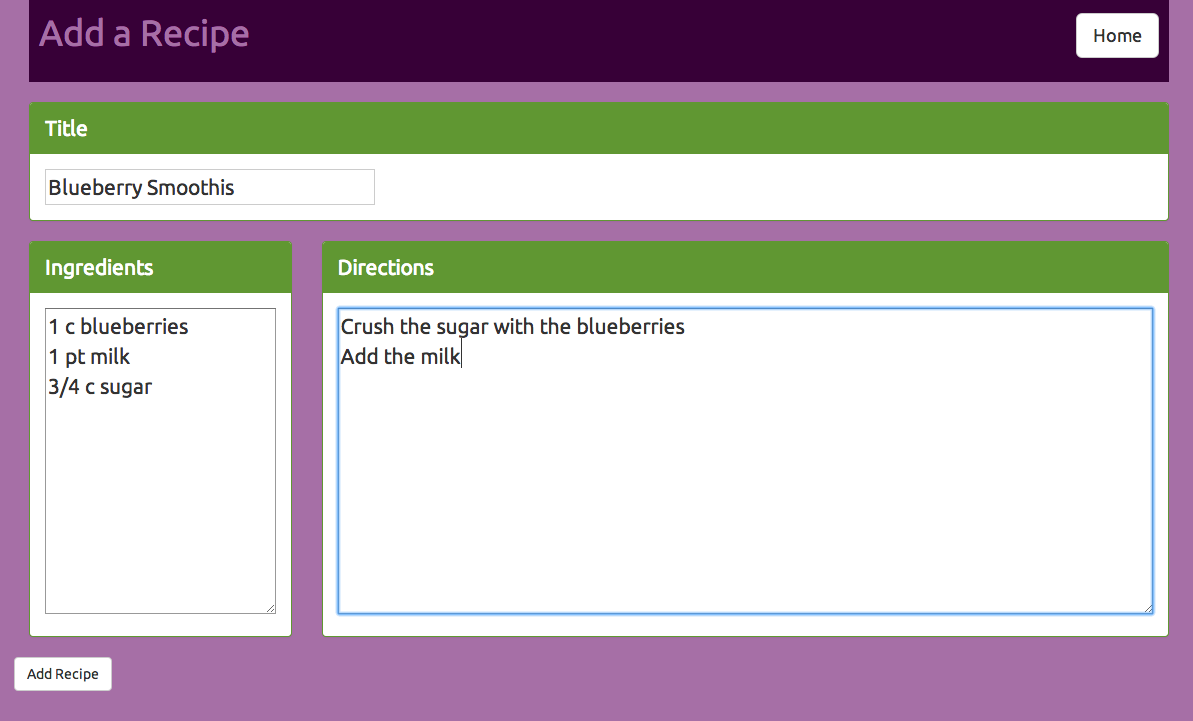
Adding a Recipe
When accessing /add, the user is presented with 3 form fields - the title, ingredients, and directions.
When the form is submitted, a bunch of things happen:
The title of the recipe is joined with + signs. i.e. “Foo bar baz pancakes” -> “foo+bar+baz+pancakes”. This is the format the Google Images api receives queries in.
A Google Image API query returns a list of URLs pointing to Google Images thumbnails.
A Python module called Colorific, which uses PIL (the Python Image Library), extracts the most prominent colors from each image, 5 colors per image. (I also wrote my own module to do this processing, but Colorific was already packaged and easy to install. )
We’re left with a list of RGB tuples. 5 colors per images times 8 images = 40 tuples long.
The Lightness value of each tuple is calculated (conversion to HSV color space), and the list is reordered in order of darkest to lightest.
The list is split into 4 smaller lists of 10 elements each. This roughly groups the colors into the 10 darkest, 10 next darkest, etc.
The average value of the 10 RGB tuples in each list is calculated. We end up with 4 tuples to store to the db along with the recipe.
The URL title is “slugified” - stripping out spaces and non alphanumeric punctuation to make a nice URL slug
The ingredients list is calculated. For each line in the ingredients box:
Split on spaces. The first 2 pieces are the amount - “1 cup” for example.
Everything after the amount is the “what”
The directions list is each line of input in the dirctions box
All this data is formed into a Python dictionary:
Title, URLs of image thumbs, ingredients, directions, slug, and average colors.
Ingredients and directions are sanitized for disallowed entries (like null string)
This Python dict is inserted into RethinkDB.
The user is redirected to the newly-created recipe.
defget_gimages(query):answer=[]foriinrange(0,8,4):url='https://ajax.googleapis.com/ajax/services/search/images?v=1.0&q=%s&start=%d&imgsz=large&imgtype=photo'%(query,i)r=urllib2.urlopen(url)forkinjson.loads(r.read())['responseData']['results']:answer.append(k['tbUrl'])returnanswer@app.route('/add',methods=['GET','POST'])defadd():form=RecipeForm()#form.ingredients.data = "1c ingredient\nenter ingredients here "
ifrequest.method=='POST'andform.validate():lightness=[]rainbow=[]resp=[]urls=get_gimages("+".join(form.title.data.split()))forurlinurls:i=cStringIO.StringIO(urllib.urlopen(url).read())quiche=colorific.extract_colors(i,max_colors=5)resp.extend([each.valueforeachinquiche.colors])resp=[(m,sqrt(0.299*m[0]**2+0.587*m[1]**2+0.114*m[2]**2))forminresp]lightness=sorted(resp,key=lambdax:x[1])lightness=[i[0]foriinlightness]lightness.sort(key=lambdatup:colorsys.rgb_to_hsv(tup[0],tup[1],tup[2])[2])foreachinchunks(lightness,10):avg=tuple(map(lambday:sum(y)/len(y),zip(*each)))rainbow.append(avg)slug=slugify(form.title.data)recipe={'title':form.title.data.title(),'ingredients':[{'amount':" ".join(ingredient.split()[0:2]),'what':" ".join(ingredient.split()[2:])}foringredientinform.ingredients.data.split('\r\n')],'directions':form.directions.data.split('\r\n'),'urls':urls,'slug':slug,'avgcolors':[list(i)foriinrainbow]}recipe['ingredients']=[iforiinrecipe['ingredients']ifnoti['what']=='']recipe['directions']=[iforiinrecipe['directions']ifnoti=='']r.table('recipes').insert(recipe).run(g.rdb_conn)returnredirect(url_for('recipe',query=slug))returnrender_template("add.html",form=form)
Editing a Recipe
The same form from /add is rendered, with the data from the existing recipe filled in. Once the form is submitted, the same process as adding happens. Instead of inserting the new recipe, however, the existing recipe’s record is updated.
The slug of the recipe appears in the URL of the page. We use that slug to get the first recipe in the db that matches that slug. Note that there’s no guarantee of uniqueness for a slug - RethinkDB doesn’t have unique indexing.
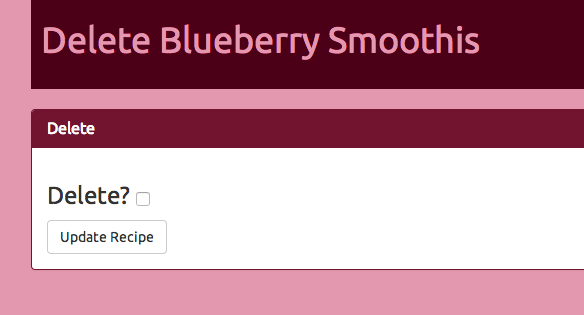
The recipe’s slug is in the URL. The user clicks “Delete”, is prompted with a checkbox to confirm, and then recipes with slugs matching the URL are deleted:
@app.route('/<query>/delete',methods=['GET','POST'])defdelete(query):form=DeleteForm()recipe=list(r.table('recipes').filter({'slug':query}).run(g.rdb_conn))ifrecipe:recipe=recipe[0]else:abort(404)ifrequest.method=='GET':returnrender_template("delete.html",query=query,recipe=recipe,form=form)ifrequest.method=='POST':if'deleterecipe'inrequest.form:id=recipe['id']r.table('recipes').get(id).delete().run(g.rdb_conn)returnredirect(url_for('index'))else:flash("Are you sure? Check the box")returnrender_template("delete.html",query=query,recipe=recipe,form=form)
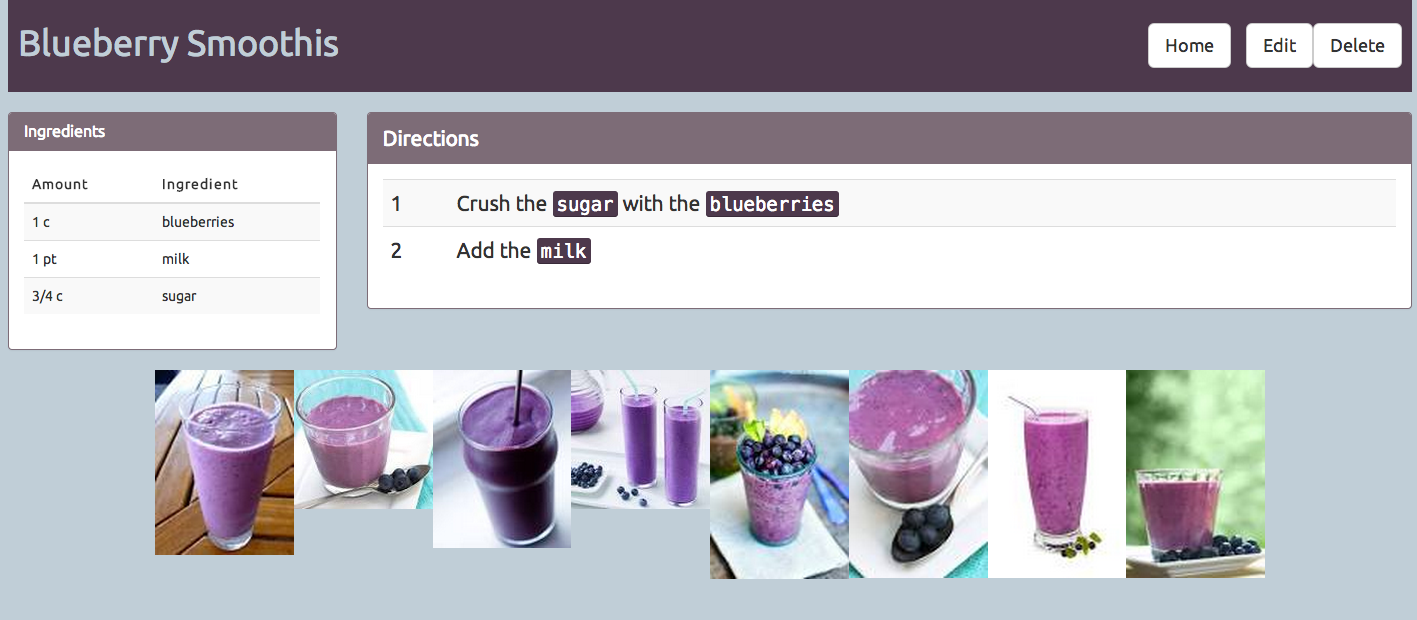
Displaying a Recipe
When a recipe’s slug appears alone in the URL, the recipe is displayed.
The first recipe in the db with a matching slug is displayed. We take the “what” from each ingredient, and only take the portion before a comma. This allows for things like “onions, diced” to appear in the recipe, but still highlight the word “onions” in the directions. If the word appears in the directions, then the word in the directions is wrapped in kbd tags, which stand out in Bootstrap.
You’ll recall that each recipe has 8 URLs of Google images and 4 RBG tuples of colors to use in displaying the page. When the page is rendered, the darkest of the RGB colors is used as the background of the header, the lightest is used for the page background and header text, and the 2nd darkest is used for the panel headers. The 4th one is reserved for future use.
Along with the 8 Google images thumbnails in place, this makes each recipe page have the unique colors corresponding to the food you’re making! So a raspberry pie has bright reds and rich tans, and a chili recipe has lots of earthy tones.
The end result of this is an iPad-optimized recipe database, customizable for your own personal recipes. Not great for importing directly from recipe sites, but great for saving your time-tested recipes in a user-friendly format.
Futures
I would like to expand this to being multi-user. I think each user would get their own RethinkDB table, and add a users table with hashed passwords.
Next up, a departure from my usual programming entries to another hobby - cooking.
It’s Veganuary! It’s a month of sacrifice for me, in the name of shedding holiday pounds.
The single hardest thing for me about going vegan is finding quick meals to make that aren’t a piece of fruit.
I think it’s similar to when I stopped eating meat. At first, I started cooking the same old meals, just with the meat removed and a vegetable or mushrooms substituted. These sometimes felt lacking. Over time, I learned to cook “natively veggie” meals - meals that were vegetarian from the start, whose flavors melded and combined deliciously without the need for meat.
Now that I’m not eating dairy or cheese, I find my usual meals lacking - because there’s no dairy or cheese. It will take some time to learn to cook “natively vegan”, I’m sure.
In the meantime, however, here’s an amazing, hearty, breakfast, that’s totally vegan.
Vegan Biscuits and Gravy
Serves 4
Ingredients
12 oz Trader Joe’s Soy Chorizo
1 medium yellow onion, diced
1 green bell pepper, diced
2 oz Earth Balance buttery vegan spread
2 oz whole wheat flour
1 Tbsp Better than Bouillon No-Beef Base
Garlic Naan or vegan english muffins
Directions
With a little olive oil, brown the chorizo, onions, and peppers in a large skillet. Once browned, move the mixture to one half of the pan.
Melt the earth balance in the empty half of the pan. Add the flour and whisk lightly until a pasty consistency is achieved. Allow this roux to brown for a minute.
Mix bouillon and 1 cup of water. Add to the roux a little bit at a time, whisking constantly until gravy-like. Mix the chorizo mixture in with the broth. Add water to thin to your liking.
Toast the garlic naan or english muffin. Slice into thin wafers and top the bread with biscuits and gravy. Yum!
Last October, I began recording temperatures for my homebrew setup. It used a C program called pcsensor that someone reverse-engineered from the Windows version available on the CD that came with my TEMPer1v1.4 sensors.
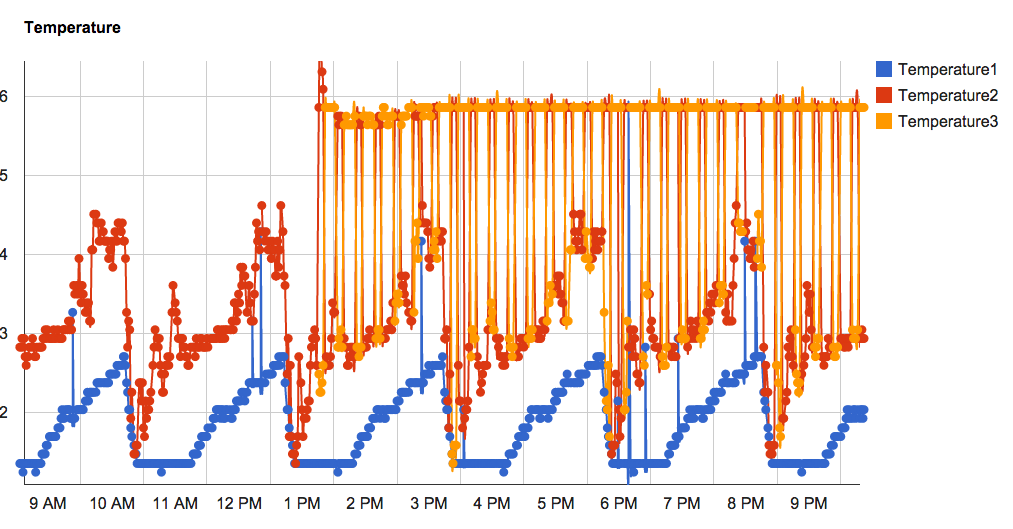
The problem with these sensors is that they have no unique identifier - reading the value in from pcsensor with multiple sensors installed often resulted in the data series being mixed together, because there was no “order” to the way data was being read into the parser.
Here’s a demonstration of what I mean:
Notice how the order of the orange and red points switch a lot? This made it really difficult to analyze the temperatures in my setup, apart from using a human to look at the trendline created by the mix of points.
I spent some time trying to create a driver for these TEMPer sensors, but in the end I was able to find one by Phillip Adelt that uses libusb and pyusb - libraries that allow you to talk to USB devices with Python.
git clone https://github.com/padelt/temper-python.git
cd temper-python
sudo python setup.py install
The ingenius thing that Phillip did was to determine the port and bus of each sensor - thus giving it a “unique ID” based on where it was physically plugged into the computer!
His module installs itself as “temperusb”, so I wrote a quick script to read the value of the sensors:
Linux limits which users can access raw USB data, so we either need to install some udev rules or run the script as superuser. Sudo is easiest for me. It outputs something like:
The bus and port will be consistent, even if the order of the entries gets switched. Now we can depend on the results of these sensors, and send them to InfluxDB:
#!/usr/bin/python
# encoding: utf-8
fromtemperusbimportTemperHandlerimportjsonimportsockethostname=socket.gethostname()th=TemperHandler()devs=th.get_devices()frominfluxdbimportInfluxDBClientclient=InfluxDBClient('hostname',8086,'root','root','temperatures')fori,devinenumerate(devs):d=[]ports=dev.get_ports()bus=dev.get_bus()d.append({"points":[[i,dev.get_temperature(format="fahrenheit"),ports,bus]],"name":"%s_temper_%s_%s"%(hostname,ports,bus),"columns":["index","temperature","port","bus"]})try:client.write_points(d)except:raiseException("Couldn't connect to influxdb")print"Couldn't connect to InfluxDB"printjson.dumps(d,indent=2)
I put this in the superuser’s crontab:
sudo crontab -e
# m h  dom mon dow   command
* * * * * /usr/bin/python /home/fred/temper_influx.py
This sends the available temperatures to InfluxDB once a minute.
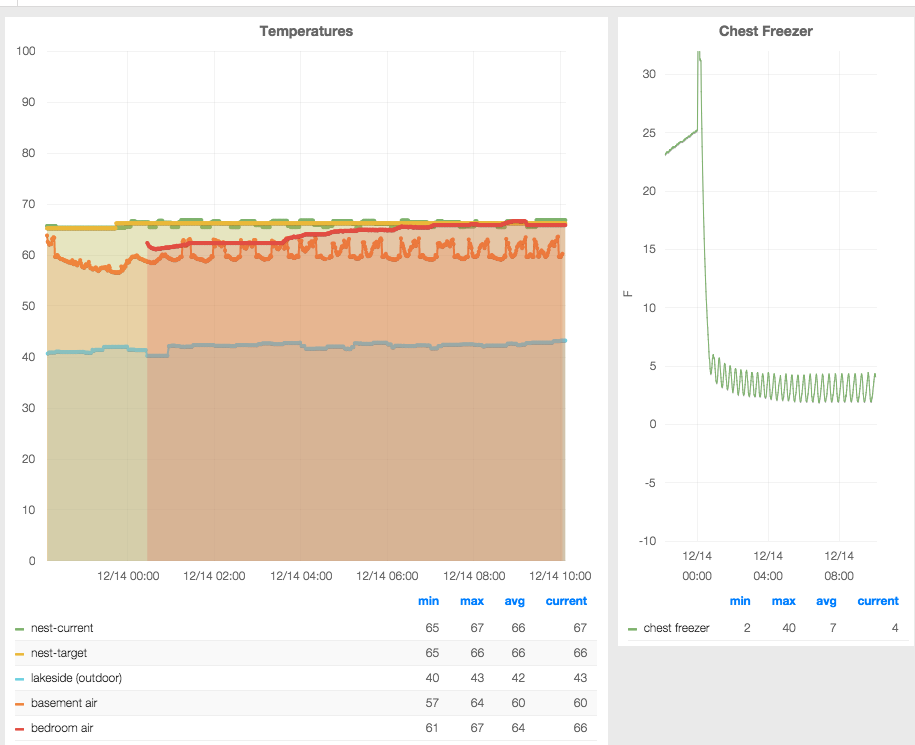
Which leaves me very happy with my temperature-monitoring setup:
Last October, I began recording temperatures for my homebrew setup. It was early in my explorations of Python and scripting, and ran in a pretty silly fashion. It went something like this:
Echo the output of a C program that read the temperatures into a log file
Parse that logfile using python to create a JSON file for Google Charts to use
Use PHP embedded in HTML via an AJAX callback function to parse that JSON file
Display the result in Google Charts
This was incredibly slow and process intensive when more than 1 week’s worth of data was captured, so I moved the log to a backup file weekly, leaving a blank file for the next week’s data.
InfluxDB has been getting a lot of buzz on HackerNews lately. It is a time-series database, which means that the primary key of any entry is the timestamp of when the data was entered into the database. Queries are done using a SQL-like syntax, but everything is oriented around time. Queries like “give me the last data value of every hour” and “what is the average value of this data point for the past 3 Wednesdays” are difficult to do with large data sets in a traditional SQL database, but InfluxDB is designed from the ground up to handle them.
For a future idea - how to join time-series data from Influx to regular relational data in MySQL? This is relevant for another project I’m currently working on. Keep an eye out for updates on that project as well.
What won me over to databases like InfluxDB and RethinkDB is the simple, no-nonsense, easy-to-use web interface that comes ready right out of the box, and the SQL-like query language. Another big win for Influx was support from Grafana, a turnkey open-source time-series graphing platform, which I highly encourage you to check out.
I set up InfluxDB on a Vagrant VM on my Mac server, with the Vagrantfile like so:
This forwards the InfluxDB ports, port 80 for serving Grafana, installs influx, Grafana, and python dependencies, and sets up cron jobs (see below).
With InfluxDB running, the first step was to capture some data! Since I bought a Nest themostat, I figured that would be a good piece of time-series data to measure.
Running this every minute via cron pulls the current temperature as well as the target temperature (what the thermostat is set to) into InfluxDB, through its easy-to-use but peculiarly-structured API.
I did the same thing with Forecast.io, my favorite weather API. This tells me the temperature outside my house:
This required me to get a Forecast.io API key, with a limit of 1000 calls per day. That’s why I call it once every 2 minutes, for 720 calls per day.
The last part of setting up the VM is to perform database migrations - set up users and databases for the temperature data to go into:
#!/usr/bin/python
importinfluxdbfrominfluxdbimportclientasinfluxdbdb=influxdb.InfluxDBClient("localhost",8086,"root","root")try:db.create_database("grafana")db.create_database("temperatures")db.switch_db("temperatures")db.add_database_user("temperatures","password")db.set_database_admin("temperatures")print"Success"except:print"Influx DB Migrations Failed"pass