I recently switched from a dedicated Windows 7 PC for my home server to a Mac Mini, mostly for the better electricity consumption and the fact the the PC was having nightly bluescreen crashes and restarting.
I have always been a fan of RDP, and my office uses PCs - so to keep the convenient RDP access to home, I installed VirtualBox and created a Windows VM. This has a bridged network adapter, so it just looks like another computer on my home network.
However, when Mac OS restarts, or after a power failure, the virtual machine is powered off. This won’t do.
Daemons in Mac OS
Mac OS has the usual suspects like cron, but has a neat daemon launching system, appropriately called launchd, introduced in 10.4.
Launchd works by “loading” (think of it like a soft-install) objects called ‘'’plist’’’. Plist is a serialized object format like JSON or XML that tells launchd the properties of how to execute a particular daemon.
If you want to play with creating your own plists, head over to http://launched.zerowidth.com, where Nathan Witmer has created a plist generator.
Automatic Tasks in VirtualBox
VirtualBox comes with a command-line interface to automate tasks on VMs. My need is simple - just boot the box:
VBoxHeadless -s Windows -v on
This follows the syntax for VBoxHeadless:
  -s, -startvm, --startvm <name|uuid>   Start given VM (required argument)
  -v, -vrde, --vrde on|off|config       Enable (default) or disable the VRDE server or don't change the setting
VRDE is the Virtual Remote Desktop extension, which allows RDP out of the box through a special Oracle tool.
Booting my VM at Login
launchd has multiple “runlevels” - there are System level daemons, and daemons for whenever a given user logs in. User daemons are stored at ~/Library/LaunchAgents/.
With the help of the launched tool, I made a plist for my command:
<?xml version="1.0" encoding="UTF-8"?><!DOCTYPE plist PUBLIC "-//Apple Computer//DTD PLIST 1.0//EN" "http://www.apple.com/DTDs/PropertyList-1.0.dtd"><plistversion="1.0"><dict><key>KeepAlive</key><true/><key>Label</key><string>io.zzzz.z3ugma.launched.windowsvirtualbox</string><key>ProgramArguments</key><array><string>VBoxHeadless</string><string>-s</string><string>Windows</string><string>-v</string><string>on</string></array><key>RunAtLoad</key><true/><key>UserName</key><string>fred</string><key>WorkingDirectory</key><string>/Users/fred</string><key>StandardErrorPath</key><string>/Users/fred/windowsvm.log</string><key>StandardOutPath</key><string>/Users/fred/windowsvm.log</string></dict></plist>
Notable options in here:
KeepAlive = True - If the VBoxHeadless process crashes for some reason, or someone manually shuts down the box (perhap from within RDP), the box restarts itself
RunAtLoad = True - Run this daemon when the daemon is loaded. “Loading” occurs at login, and when a user manually loads the daemon.
WorkingDirectory & UserName - These are special directives needed because of the peculiar way that VirtualBox runs. Just set it to the home folder of the user running the daemon.
This xml is saved into a file in /Library/LaunchAgents. Navigate to that directory, and execute
launchctl load <name of plist>
launchctl is the program that Mac OS uses to control launchd processes. Once the plist has been loaded, it should persist after reboot.
A similar plist can be used for the command ‘vagrant up’ to launch vagrant vms.
I switched from Octopress to Jekyll. I find that it is cleaner, easier to understand, and doesn’t require me to puzzle through Git branches and remotes.
There’s a great package manager for Mac called Homebrew that acts sort of like Aptitude on Ubuntu; it makes it really easy to quickly install software for your Mac from the command line.
The Casks platform is built on top of Homebrew - it allows you to install your commonly-used desktop apps for Mac. This makes writing a setup script for when you reformat easy.
It also makes Casks a great place to explore to find new Mac software you didn’t know existed. Unfortunately, the most you can see from the Casks master list on Github is the name of the software - you have to go into each .rb to find the URL for the website of the software.
I wrote a quick and dirty script to go through all of these Casks and make a text file that I can put in Excel to open all the websites at once.
First, we download all the files in the github repo to our target folder, then we run:
An enterprising fellow from Milwaukee built a site to automatically pay parking tickets in his city and in Madison. Unfortunately, the city of Madison changed around their ticket-payment website, so the site is not working. I thought it would be a good programing challenge for me.
How Do You Work with Web Services When They Have No API?###
Since the City of Madison doesn’t have an API on their website, it’s not a simple matter of sending a query and getting back a nicely-formatted JSON response to use in my app. So how can I get the information that I need from the website?
Fortunately, all websites have at least one available point of entry - via the web, as a user! There’s a Python package to emulate user behavior in a browser and return the HTTP response, which we can further manipulate as we want.
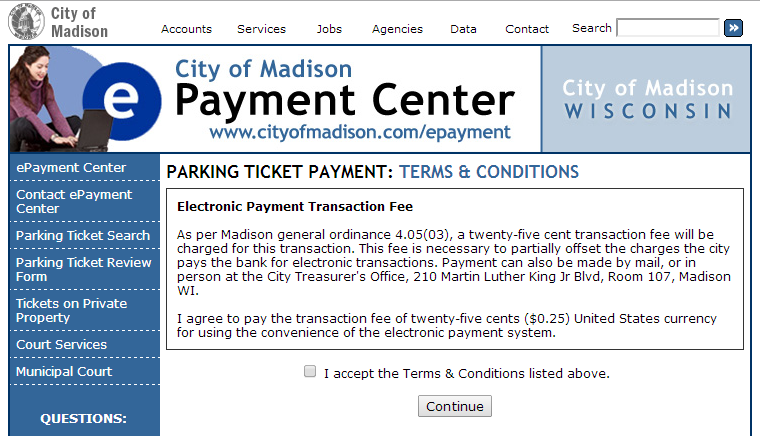
This is Mechanize, originally developed for Perl. I install the Python package and make a script to go to the City of Madison’s parking ticket payment site at https://www.cityofmadison.com/epayment/parkingTicket/. I based this on an example at http://stockrt.github.io/p/emulating-a-browser-in-python-with-mechanize/.
importosimportsysimportmechanizeimportcookielib# Browser
br=mechanize.Browser()# Cookie Jar
cj=cookielib.LWPCookieJar()br.set_cookiejar(cj)# Browser options
br.set_handle_equiv(True)br.set_handle_redirect(True)br.set_handle_referer(True)br.set_handle_robots(False)# Follows refresh 0 but not hangs on refresh > 0
br.set_handle_refresh(mechanize._http.HTTPRefreshProcessor(),max_time=1)# Want debugging messages?
#br.set_debug_http(True)
#br.set_debug_redirects(True)
#br.set_debug_responses(True)
# User-Agent (this is cheating, ok?)
br.addheaders=[('User-agent','Mozilla/5.0 (X11; U; Linux i686; en-US; rv:1.9.0.1) Gecko/2008071615 Fedora/3.0.1-1.fc9 Firefox/3.0.1')]# Open some site, let's pick a random one, the first that pops in mind:
r=br.open('https://www.cityofmadison.com/epayment/parkingTicket/search.cfm')html=r.read()# Show the source
#print html
This returns us the html of the city’s parking ticket page as a big string of HTML.
Searching for Tickets##
In order to search for a parking ticket, it looks like I need to first accept the terms and continue.
Since Mechanize is ‘stateful’ - it acts like a browser tab that a user would have open - I can submit this form and continue working with my browser class.
Before we do that, here are some other things you can do with Mechanize:
# Show the source
#print html
# or
printbr.response().read()# Show the html title
printbr.title()# Show the response headers
printr.info()# or
printbr.response().info()#Show the available forms
forfinbr.forms():printfprint'\n'
Back to the main objective. We need to first:
Find the form on the page with the checkbox
Select the checkbox
Submit the form to continue
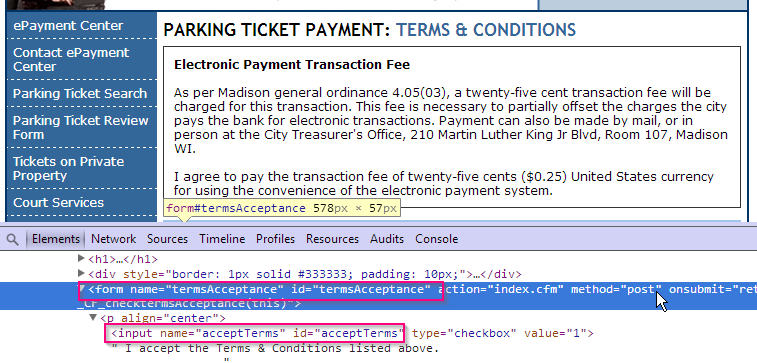
#fet First hurdle: Accepting the terms. Here we find a form, click a checkbox, and submit the form to load the next page into mechanize
br.select_form(name='termsAcceptance')br.find_control(name="acceptTerms").value=["1"]br.submit()
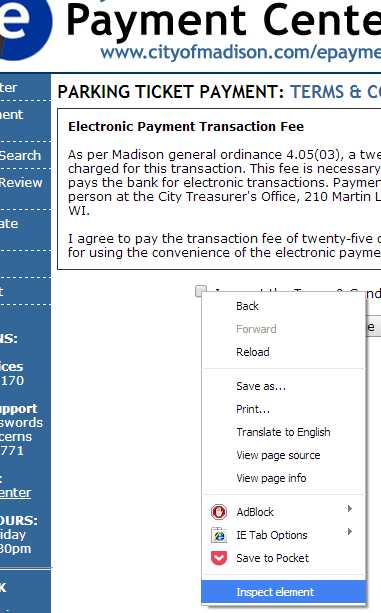
In order to do this, I needed to find the name of the form and the checkbox control. I used Chrome Developer tools to inspect it:
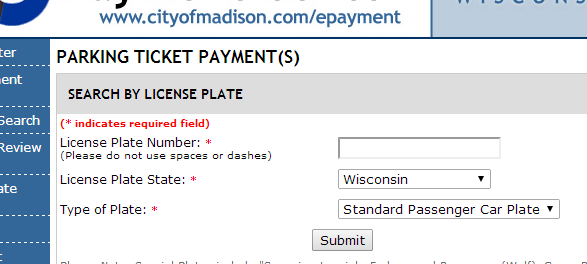
So we follow that action in our simulated browser and are brought to the Search page:
Great news! This is where we can enter our first dynamic input - a license plate to test. I do a similar inspection and find the names of the form and controls I need to manipulate:
br.select_form(name='plateSearch')br.find_control(name="Plate").value='123ABC'br.find_control(name="State").value=["WI"]br.find_control(name="VehTyp").value=["PC"]br.submit()text=br.response().read()#fet For inspection, we can write the text of the page that loads to a file
withopen('msnticketresponse.html','wb')asf:f.write(text)f.close()
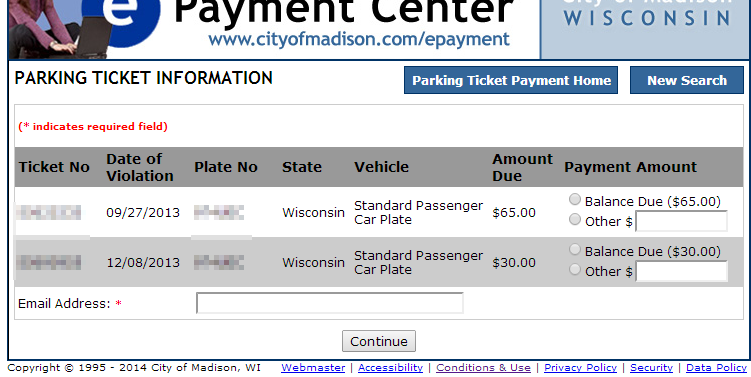
Here’s what the HTML of the search returns for a plate with existing tickets:
Manipulating the HTML Search Results to Work With Them in Python
We need to take the HTML output and parse the page. The problem is that the output is not always regular. We need something like regular expressions that will let us recognize certain, sometimes repeated parts of the page.
The LXML library is a good starting place to process XML and HTML in Python.
We’ll also take advantage of XPATH, which is like regex for XML:
Let’s inspect the HTML of the search results to find what is regular about these ticket results.
I’ve skipped over the header of the page and gone right to the meat of where the tickets are:
We see that each discrete piece of data about each ticket is contained in a table cell <td>, and that each of these is the child of a <tr> that stands for each ticket. To get each ticket, we’ll figure out what is common to those <tr>s.
Each is the direct child of a form. Since there’s only one form on the page, we can start there. Note that XPATH requires some strict syntax and won’t necessarily follow the design of your element nesting here.
Here’s the XPATH syntax that finally worked to return each ticket and nothing else:
text() - Select the text inside this element (as opposed to the class, or the href, or another attribute)
//td - Select ALL <td> elements (even if they’re not the direct child)
/tr[position()>2] - This is the complicated one. Select <tr>s that are the direct children of the parent (one slash). Only select <tr>s that are the 3rd or greater <tr> child of their parent. This is to accommodate for these two <tr>s in our page that come before the tickets:
<tr><tdcolspan="7"class="RequiredLabel"><br>(* indicates required field)<br><br></td></tr><trclass="backgroundMedium"><tdclass="Heading14Bold"width="12%">Ticket No</td><TDclass="Heading14Bold"width="12%">Date of Violation</TD><TDclass="Heading14Bold"width="12%">Plate No</TD><TDclass="Heading14Bold"width="10%">State</TD><TDclass="Heading14Bold"width="19%">Vehicle</TD><tdclass="Heading14Bold"width="10%">Amount Due</td><tdclass="Heading14Bold"width="25%">Payment Amount</td></tr>
//form/table - Select tables that are the direct children of ALL forms on the page.
Whew.
This give us (semi) nice lists like:
[' S123456 ','09/27/2013 ','123ABC ','Wisconsin ','Standard Passenger Car Plate ','\r\n\t\t\t\t\t\t\t\t\t$65.00 \r\n\t\t\t\t\t\t\t\t','\r\n\t\t\t\t\t\
t\t\t\t\t','Balance Due ($65.00)','Other $',' S123457 ','12/08/2013 ','123ABC ','Wisconsin ','Standard Passenger Car Plate ','\r\n\t\t\t\t\t\t\t\t\t$30.00 \r\n\t\t\t\t\t\t\t\t','\r\n\t\t\t\t\t\t\t\t\t\t','Balance Due ($30.00)','Other $','Email Address: ','*','\t','\r\n\t\t\t\t\t\t\t\t']
There’s a lot of garbage in there, like carriage returns, tabs, and spaces. Additionally, we’re only interested in some of the list elements:
#Strip out extra spaces, newlines, tabs.
#For each of these characters, replace itself with null in every element in tickets.
#Redefine tickets as this new string-replaced list.
chlist=['\n','\r','\s','\t']forchinchlist:tickets[:]=[s.replace(ch,'')forsintickets]#Build a dictionary, d. Parse the list of all tickets, organize them ordinally in a dictionary.
#Each dictionary entry will be a list. Pop the first 9 values off of tickets and create a new dictionary entry.
#Take the new tickets list and pop the next 9 values. Iterate until the list is too small to possibly contain a ticket (less than 4 elements long)
d={}i=0#Counter
whilelen(tickets)>4:d[i]=tickets[:9]tickets=tickets[9:]#Increment the counter
i=i+1#Neatly printing our output:
#Define our output template
template='''Ticket No: %s
Date of Violation: %s
Plate No: %s
State: %s
Vehicle: %s
Amount Due: %s'''# For each entry in the dictionary, replace the template with the real values and insert a new line.
fortind.values():results+=template%(t[0],t[1],t[2],t[3],t[4],t[5])+'\n\n'printresults
Apart from the neatly printed output, we also now have a dictionary of tickets. We’ve achieved the goal of a fake ‘API’ for searching for parking tickets.
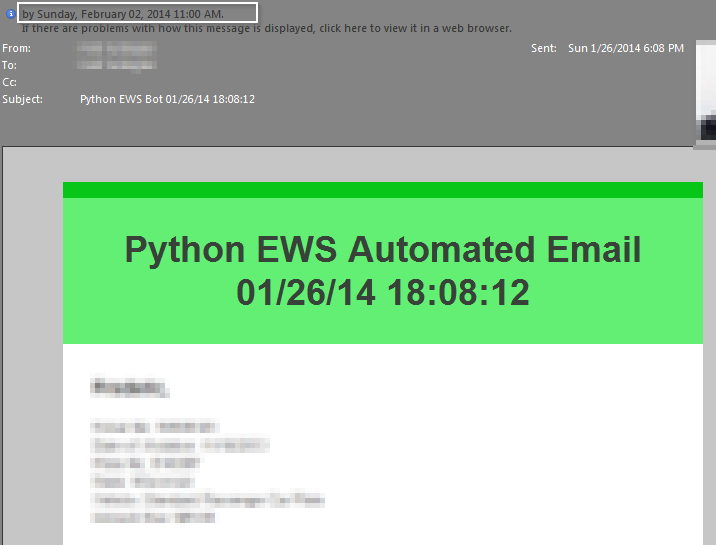
Part 2: Getting the Python EWS Client to Send an Email
Now that I’ve got a client connect to the Exchange server, I can actually use the SOAP API methods as documented in the WSDL and on Microsoft’s documentation.
Suds has great built-in methods and classes for working with SOAP, but as this post confirms, bugs in both Suds and EWS mean that I’ll have to manually build the XML and inject it directly into the message.
So far, I have code that will connect a Suds client to my exchange server and send an XML message:
importewsclient#Changes to Suds to make it EWS compliant
importewsclient.monkey# More Suds changes
importdatetimeimportosimportsysimportsuds.clientimportloggingimporttimefromsuds.transport.httpsimportWindowsHttpAuthenticated#Uncomment below to turn on logging
#logging.basicConfig(level=logging.DEBUG)
#Logging on/accessing EWS SOAP API
domain='exchange server'username=r'DOMAIN\username'password='password'transport=WindowsHttpAuthenticated(username=username,password=password)client=suds.client.Client("https://%s/EWS/Services.wsdl"%domain,transport=transport,plugins=[ewsclient.AddService()])#Now that the SOAP client is connected to EWS, send this XML soap message
client.service.CreateItem(__inject={'msg':xml})
Now, we just need to tell it what to send in that message.
Building the XML Message
There are all kinds of things you can talk to EWS about, but I just want to talk about emails.
In my first iteration, I had the body sent as text but I wanted to replace it with an HTML email template to make it prettier. This was tough for me to figure out; I kept getting XML validation errors. Eventually, I learned about CDATA, a tag that tells the XML parser to ignore whatever’s inside it.
And will replace the #Body# with some HTML from an email template later.
Lastly, I put in some information about an automatic Reminder to get the final message:
Each of those #Variable# tags I put in the XML will be string-replaced on the Python side.
Putting Variables into the Message
I wrote a quick little function to take a list of tuples and a template text and replace the text in the template:
#Replacing the text in the XML SOAP message
defxmlreplace(text,list):foriinlist:ifi[0]intext:text=text.replace(i[0],str(i[1]))returntext#Make a string out of the current time
curdatetime=time.strftime("%c")#Set the Reminder Date for one week from today
reminderday=datetime.date.today()+datetime.timedelta(days=7)#Open an HTML file to use as the body
template=(open(file,'r'))body=template.read()#List of parameters in the XML to replace: (template, replacement).
xmlparams=[('#SubjectDate#',curdatetime),('#Body#',body),('#ReminderDate#',reminderday)]# Replace everything in the XML template shown above with the new dynamic values
xml=xmlreplace(xmltemplate,xmlparams)
Now that I have XML as a big string, I can send my message: